Showing posts with label freezer meal. Show all posts
Friday, February 8, 2013
Peanut Butter Brownies
Do you ever bake something, or buy something, knowing the entire time you are doing it that it is a BAD idea? I tend to do that a lot. I'm all like 'Oh a brownie sounds good' and then I'm looking through my pinterest boards, baking a whole batch, then eating the end pieces to 'test' and then of course having a 'real piece' and then having a bite once they've all cooled. Dont forget that one I tried after they had frozen. It's just a really bad process and I know it every step of the way! But, I do it anyway and I enjoy each bite just like I should.
I looove these brownies. Especially because I keep them in the freezer and these came out undercooked. The best way to eat a frozen brownie is when it's undercooked because it's very soft, but without tasting completely like batter. If you are going to eat these fresh I would cook another couple of minutes but if you plan to freeze, just go with the recipe time.
and yes, that brownie is sitting atop a Hello Kitty Valentines box. Remy is giving those out, along with Rubber Duckies, to her classmates this year :) But I wouldn't dare give away these brownies with them.
Peanut Butter Brownies (slightly adapted from Blue Eyed Bakers)
1 package of brownie mix (I used Duncan Hines and a 10x10 pan)
2 eggs, room temperature
1/3 cup vegetable oil
1 teaspoon vanilla extract
1 14-ounce can sweetened condensed milk
1/2 cup chunky peanut butter (not old-fashioned)
1 tbsp cremy peanut butter
Preheat oven to 350 degrees. Lightly spray a baking pan - you can choose how thick you want them to be. for me I had to spread the brownie batter really thin, but I like how they came out.
In a large bowl, combine the eggs, oil and vanilla extract and whisk well. Add the brownie mix and stir until combined.
Spread half the brownie mixture into the pan first using a spoon and then using your hands to flatten evenly.
In a medium bowl, using a rubber spatula or spoon, mix together the sweetened condensed milk and the peanut butter until smooth. Gently spread the mixture over the first layer of brownie until evenly covering the brownie mix. (I found that I had a little leftover, so feel free to just eat that! :) )
Break the remaining browniemix into pieces and flatten with your hands and slowly and gently spread over the peanut butter mixture. It will be a bit messy. Use your hands to coax the final brownie layer into the corners and covering the peanut butter. (some of my edges weren't covered by the top brownie mix, but that turned out to be ok)
Finally, bake the brownies for 25-30 minutes until the top is set and the edges are lightly browning. Cool on a wire rack before cutting and serving.
Thursday, January 31, 2013
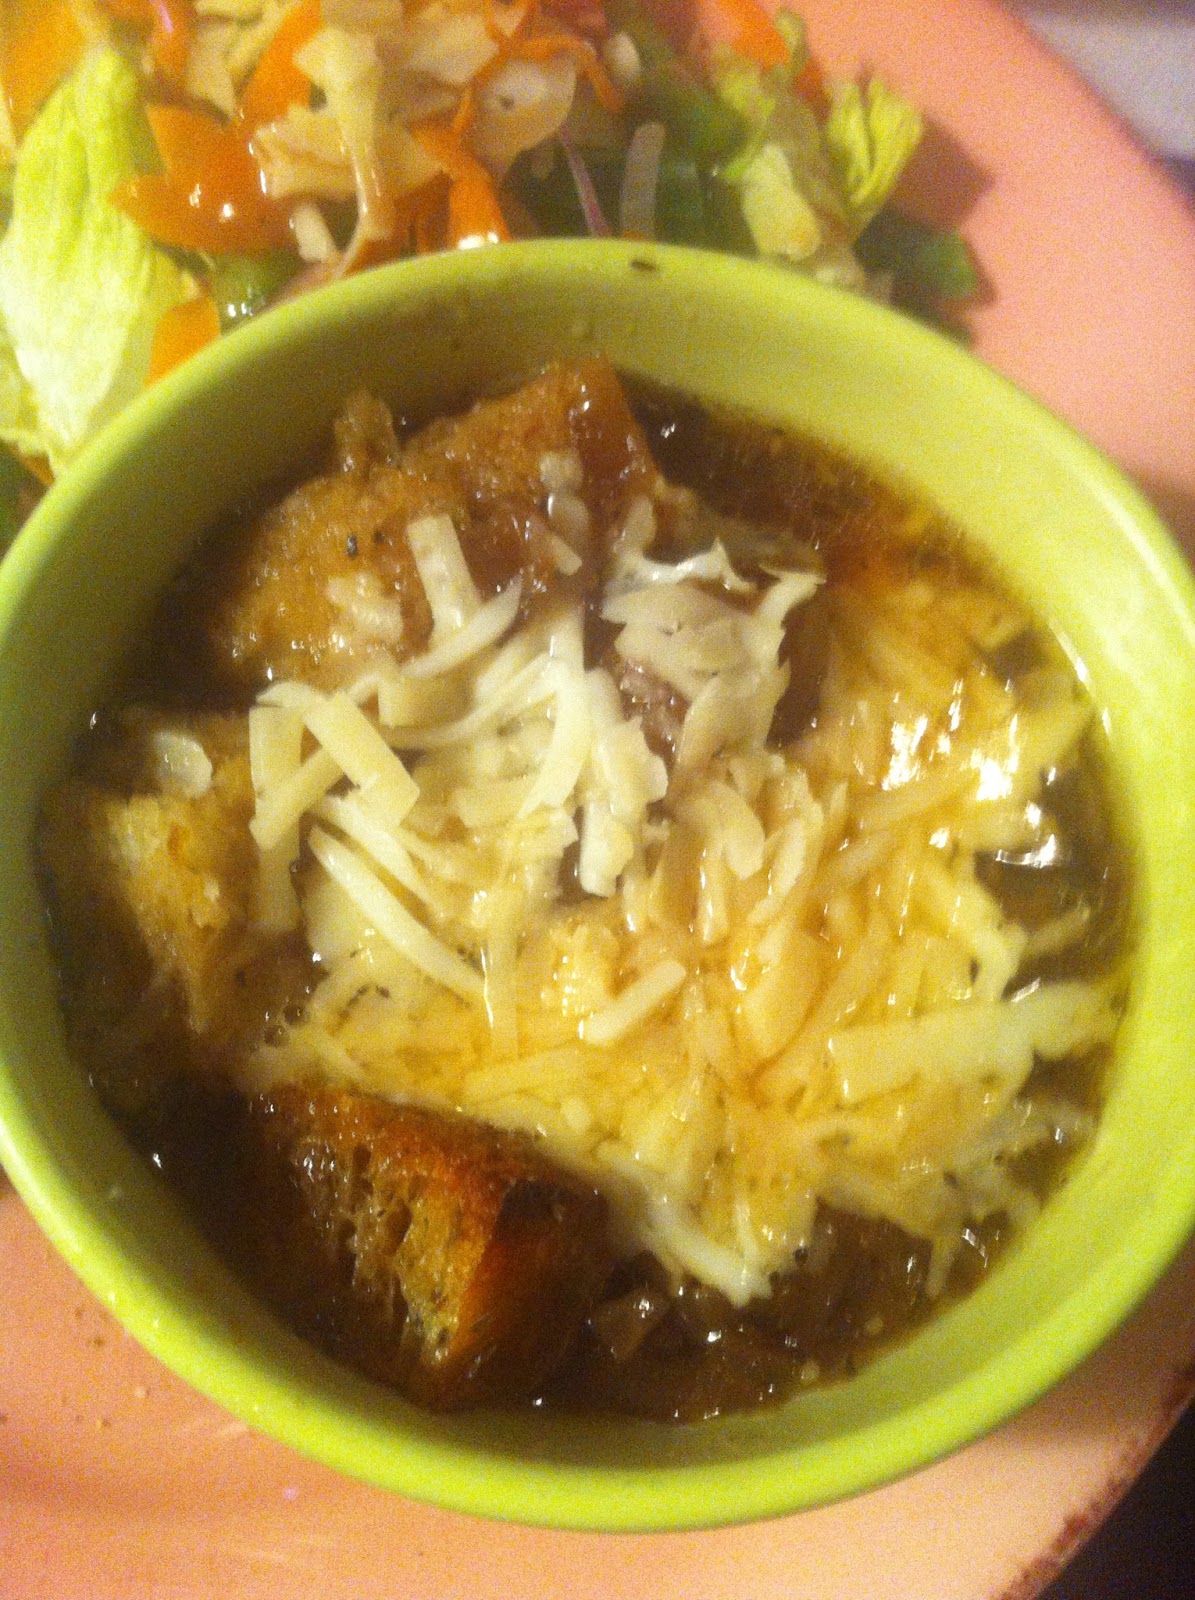
Crock Pot French Onion Soup
We are still in the season of soups. January is, I think, the coldest month most places so I know that a lot of you are still dreading going outside. You're bundling up and enjoying time on the couch, by the fire, drinking tea or coffee or hot chocolate. Well, I am anyway and I'm not really North!
I found this recipe on Pinterest way back and finally gave it a try. It is the best crock pot meal that I've ever tasted. The work of caramelizing the onions before hand really pays off with the flavor. I went the route of making croutons and I didnt broil with the cheese. You'll see the way I did it below but feel free to go to the original source and see what they did. Either way you finish it off, the flavor of this soup is the same as restaurant quality - I promise!
French Onion Soup (adapted from All Recipes)
6 tablespoons butter
4 large yellow onions, sliced and separated into rings
1 tablespoon white sugar
2 cloves garlic, minced
1/2 cup cooking sherry
7 cups reduced-sodium beef broth
1 teaspoon sea salt, or to taste
1/4 teaspoon dried thyme
1 bay leaf
French Bread, cubed
Olive Oil
Onion Powder, Garlic salt, Garlic Powder, Oregano, Basil (or any seasonings you want/have)
1/2 cup shredded Swiss cheese
1/3 cup shredded Asiago cheese
1/4 cup freshly shredded Parmesan cheese
2 tablespoons shredded mozzarella cheese
Heat butter in a large, heavy pot over medium-high heat; cook and stir onions until they become translucent, about 10 minutes. Sprinkle onions with sugar; reduce heat to medium. Cook, stirring constantly, until onions are soft and browned, at least 30 minutes. Stir in garlic and cook until fragrant, about 1 minute.
Stir sherry into onion mixture and scrape bottom of pot to dissolve small bits of browned food from the pot. Transfer onions into a slow cooker and pour in beef broth. Season to taste with sea salt; stir in thyme and bay leaf. Cover cooker, set on High, and cook 4 to 6 hours. If desired, set on Low and cook 8 to 10 hours.
At any point you can make your croutons. Simply toss the bread in a large bowl with olive oil. then add your seasonings and toss again, to coat each piece. Spread on a baking sheet and bake at 375 for 4 minutes or so, turning half way through.
When soup is done, ladle into bowls, then add croutons and sprinkle your cheese mixture on top. Let sit for a minute or 2 so that the cheese can melt from the heat of your soup.
Monday, December 17, 2012
Buffalo Turkey Burgers
I have a deep love for buffalo sauce. Surprisingly this love affair didn't start until a few years back, but now I can't get ewnough. Buffalo chicken on sandwiches, salads - buffalo wings - buffalo chicken dip -and now buffalo turkey burgers.
I always buy the 93% lean turkey meat, so it gets dried out pretty easily. I usually stuff them to make them moist and gooey, but last night I took this recipe to my burgers and the result was awesome! Thank you again, Skinny Taste! Our skinny burgers were full of flavor and not at all dry. I left out the slaw and topped ours with provolone and a little light blue cheese dressing. I prepared them on our grill pan and when it came time for cheese i just covered the tops with a saucepan lid to keep the heat in and melt it perfectly.
This is going into our nightly rotation, especially since it's one meal that I always have the ingredients for. Rolls and meat are always in the freezer :)
Buffalo Turkey Burgers (slightly adapted from SkinnyTaste)
1.25 lbs 93% lean ground turkey
2/3 cup grated carrots
1/4 cup seasoned breadcrumbs
1 clove garlic, grated (I used garlic powder)
1 tbsp red onion, grated
1/4 cup Franks Hot Sauce
salt and fresh pepper
oil spray
5 slices provolone
5 burger buns
*I only made 2 burgers. I basically just eyeballed all of the amounts since theres really no science to it*
In a large bowl, combine ground turkey, carrots, breadcrumbs, garlic, onion, hot sauce, salt and pepper. Makes (5) equal patties.
Heat grill pan, or grill, and place burgers on grates. Cook for 4-5 minutes, until cooked about half way through. Flip and cook until done. Place cheese on top and let it melt.
Top your bun with light blue cheese dressing and tomato, or any other toppings you'd like.
Saturday, December 1, 2012
White Chocolate Cranberry Cookies
I wonder when cookies became a Holiday staple? I mean, if you are looking to bake something from Thanksgiving-New Years it is probably one of the first things that you think of. Especially when you have a cookie exchange, company or need a personal gift - you look for something new with a little kick.
Enter these babies. They pretty much scream Holiday Time. I love how the cornstarch makes them thick and soft and the cranberries add a perfect twist to the sweetness. Usually I'm not really a white chocolate chip kind of girl, but this cookie is an exception.
I love cookies for the reason that you can bake them, freeze and when you pull them out they are just as perfect as when they go in. If you're having a party it makes it so easy to have your dessert taken care of early. Or if you're making them as gifts you can do it ahead of time so that you arent in such a rush the night before you see the person.
I currently have a freezer full of 3 types of cookies (about 2.5 dozen or so of each) plus an entire gallon bag of Buckeye bark. Um yea, I think I'm on cookie overload, but this is the one time of year where I feel that is perfectly acceptable :) So even if you have no real excuse to bake more cookies, just throw them in the freezer once they are cooled and you can enjoy them yourself for weeks to come. Happy baking!
White Chocolate Cranberry Cookies (from Sallys Baking Addiction)
3/4 cup (1.5 sticks) unsalted butter, softened to room temperature
3/4 cup dark brown sugar
1/4 cup granulated sugar
1 large egg, at room temperature
2 teaspoons vanilla extract
2 cups all-purpose flour
2 teaspoons cornstarch
1 teaspoon baking soda
1/2 teaspoon salt
3/4 cup white chocolate chips
3/4 cup dried cranberries
In a large bowl using a hand-held mixer or stand mixer with paddle attachment, cream the butter and sugars together on medium speed until fluffy and light in color.
Mix in egg and vanilla.
On low speed, mix in flour, cornstarch, baking soda and salt. Stir in white chocolate chips & dried cranberries. Chill dough (covered) for 30 minutes or up to 3 days. (I left mine in the fridge for a couple of hours and it was perfectly firm when I scooped it up)
Preheat oven to 350F.
Drop balls of dough (1.5 tablespoons each) onto cookie sheet OR used a standard-sized cookie scoop.
Bake for 8-9 minutes, until barely golden brown around the edges. Do NOT cook them longer than 9 minutes.
Remove and let cool for 5-10 minutes on the cookie sheet. Transfer to cooling rack.
Tuesday, November 13, 2012
Cheesy Vegetable Chowder
I have a real love for Panera's Broccoli Cheddar Soup. In fact, I get it 99.9% of the time that I go there. It can be 100 degrees out and I will order my soup with a smoked turkey sandwich (or a sierra turkey if I really want to be bad). The calories aren't really that high for the 1/2 portion, but when I moved to Nashville I moved away from Panera. I have one by work, but I really don't have time to get there and it isn't conveniently on my way home (especially now that I have a baby in tow).
Anyway, I can safely say that I was having some serious withdrawls. Especially when the fall weather hit, I needed some soup and stat. Enter in Pinterest. Adam helped me whip up this soup and it was seriously so easy and so delicious. We both really enjoyed this and next time I will double the recipe and freeze half.
I love that there is no heavy cream involved. And I used skim milk. It was still creamy and perfect with a baguette, a la panera :) the only thing that I had to change was the rue (the water and flour mix) - the soup wasn't thickening up enough so at the end we added in another portion of rue, only less water and more flour - and it thickened up perfectly. So you may have to play around with that, but leave it until the end to see. Sorry for the crap pic, we ate it at night and had no leftover to photograph the next day.
Cheesy Vegetable Chowder (from LuLu the Baker)
2 Tablespoons butter
1/2 cup chopped onion
1 cup finely chopped carrot
1 celery stick, finely chopped
1 Tablespoon minced garlic
4 cups chicken broth 1 Tablespoon flour
1/2 cup water
2/3 cup milk
2 cups chopped broccoli
2 heaping cups shredded cheddar cheese
Melt the butter in a large soup pot. Add onions, carrots, and celery and saute over medium heat until tender. Add garlic and cook 1 or 2 additional minutes.
Add chicken broth and potatoes, bring to a boil, and cook 25-30 minutes.
Mix flour with water, add, and simmer until soup is slightly thickened.
Add milk and broccoli and cook until broccoli is just tender and soup is heated through. Stir in cheese, allow to melt, and serve.
Thursday, September 6, 2012
Salsa Chicken Quesadilla
So you know by now that I am back to work, we started daycare, and nights are crazy. Seriously, on work days I get home, have to throw the diapers in the laundry, clean 5 bottles, clean all of my pump parts (Im not sparing you the deets of my day!), package my milk from the day, empty my gym bag, clean my coffee mug and water bottles, bathe Remy, play with Rem and attempt to eat at some point. It's a routine that will take some time to perfect, but makes me happy for easy meals to throw together.
I used the salsa chicken from the freezer to make this quick meal that is also so delicious, which probably has a lot to do with the gooey ooey cheese :)
Salsa Chicken Quesadillas
Red Onion, sliced into thin rings and then cut in half
Green Pepper, sliced into strips and then cut in half
Mushrooms, sliced
dash of Olive Oil
Whole Wheat Tortilla Shell
Salsa Chicken
Cheddar Cheese, shredded
dash of Cumin
Fat Free Sour Cream & Salsa, for topping
In a small pan add oil, onion, pepper and mushrooms. Cook on medium/low for 25 minutes, until everything is softened up. Heat up your salsa chicken a bit (I use the microwave). Remove veggies from pan and wipe oil out.
Spray your pan with nonstick spray and place your tortilla shell, folded in half, into the pan. Add cheese, veggies, chicken and then more cheese. Fold the top half of the tortilla over. Once bottom cheese has melted, flip and cook through on the other side.
Ta-Da!
Wednesday, August 29, 2012
2 Ingredient Pumpkin Muffins
In 1 week we will all be ready for fall. Pools will be closed and the temps will slowly begin to subside across the country. By the end of September we should have average highs of only 79 here - so perfect! I made these muffins a month or so ago and have them stashed in my freezer. I needed a taste of fall and wanted to test out this extremely simple recipe.
There's only 40 calories in a mini muffin which won't break your calorie bank and these go great with a cup of joe - but don't think that this is a substitue for true pumpkin bread. It lacks some flavor and could use some pumpkin pie spice and ground cloves mixed in. But theres no need to really tweak this - make it when you're in a pinch but save your pumpkin bread recipe for when you need a true slice of pumpkin-y goodness!
2 Ingredient Pumpkin Muffins
1 box Spice Cake mix
1 15 oz can Pumpkin Puree
Mix both together and pour into muffin tins, large or small.
Bake for 15 minutes for minis and 25 for larger - I suggest checking them regularly though, so that you do not over bake.
Thursday, August 23, 2012
Top O the (Blueberry) Muffin to You!
It isn't very often that I bake something that Adam will eat. In fact, unless we have cookies (in the freezer) or cookie cake, he really doesn't eat baked goods. I found these muffin tops on pinterest and thought I'd bake them up since I've had 1 cup of blueberries in my freezer for a little while now, with no real vision for them.
I failed to get any kind of decent photo of these, and its a shame because they really are very tasty! Even Adam raved about them, twice. Which let me tell you, that doesn't happen often. They are perfect for company or to throw in the freezer, individually wrapped, for a snack or breakfast on the go. Personally, I would throw in more blueberries next time. I will also put in some of the juice to make them more blueberry throughout, like the original posters photos. Either way, it's Goodbye stumps and hello tops. Oh, and try to not think of the Seinfeld episode while you bake and eat these - I bet you can't do it!
Blueberry Muffin Tops (from Iowa Girl Eats)
2 cups flour
2 teaspoons baking powder
1/2 teaspoon salt
1/2 cup salted butter, softened
1 cup sugar
1 egg
1/3 cup milk
1 teaspoon almond extract (I used vanilla and everything was still a-ok)
2 teaspoon lemon zest, about 1 lemon
1 cup frozen blueberries, thawed and drained
Preheat oven to 375 degrees.
Combine flour, baking powder, and salt in a bowl, set aside.
In the bowl of your mixer, cream together butter and sugar until well combined. Add in egg and beat until combined. Add milk, almond extract and lemon zest then beat until combined.
Slowly add dry ingredients into the wet ingredients, and mix until combined. Gently fold in blueberries. The dough will seem too thick, but just keep at it!
Refrigerate the dough for at least one hour, then shape into large balls.
Bake 6 to a baking sheet for 13-15 minutes, or until slightly golden brown on the bottom, and set on top.
Do not overbake, Let cool on the baking sheet for 5 minutes, then transfer to a cooling rack to cool all the way. If you don't plan to eat these all immediately, once they cool wrap each top in plastic wrap and then put them all into a gallon freezer ziploc and freeze.
Thursday, August 16, 2012
Salsa Chicken Enchiladas
You know that feeling when your husband has knee surgery and is laid up, helpless and waiting on dinner? And you are toting your 2 month old because said husband can't really help with her? No? Well, I do! I found the perfect time to pull our frozen crockpot salsa chicken from the freezer when this happened a few weeks back.
I didn't really want to slave in the kitchen all night, so this was a life saver for me. I just had to find new ways to use it and this is now one of my favorite meals! I was always nervous about making enchiladas for some reason, but this was great and I used all low cal ingredients to make it more diet friendly.
Salsa Chicken Enchiladas
Salsa Chicken
Low Carb, 100 calorie Whole Wheat Tortillas
Shredded Mexican Cheese
2 Jalapenos, sliced
1/2 Red Onion, Sliced into half rings
Dash of olive oil
Pinch Cumin
10 Minute Enchilada Sauce (recipe below)
Velveeta Queso Blanco, mixed with milk and heated
Lettuce, beans, rice, fat free sour cream to plate with
Preheat oven to 400 degrees. Line a baking pan with foil, if you want to avoid cleaning like I do.
In a small pan, heat jalapeno and onion on low with your dash of olive oil and pinch of cumin for 20 minutes, or until soft.
Pile up your tortillas and pop inth emicrowave for about 30 seconds to get them soft. Ladle a few spoonfuls of your enchilada sauce in the bottom of your baking pan, just enough to coat the bottom of the pan.
Place some enchilada sauce in a large shallow bowl (big enough to fit a tortilla).Take one tortilla and coat one side in enchilada sauce. On the side that you coated, place a sprinkle of cheese, a scoop of chicken and some of the jalapeno/onion mix. Roll up and place seam side down in your baking dish. Repeat with remaining shells.
Ladle more of the sauce on top once all of the enchiladas are rolled and in the pan. Bake for 25 minutes. Top each enchilada with about 2 tbs of your queso blanco.
10 Minute Enchilada Sauce (from all recipes)
1/4 cup vegetable oil
2 tablespoons flour
1/4 cup Mexican chili powder
1 (8 ounce) can tomato sauce (I used a 6 oz can of tomato paste and was fine)
1 1/2 cups water
1/4 teaspoon ground cumin
1/4 teaspoon garlic powder
1/4 teaspoon onion salt
salt to taste
Heat oil in a skillet over medium-high heat. Stir in flour and chili powder, reduce heat to medium, and cook until lightly brown, stirring constantly to prevent burning flour.
Gradually stir in tomato sauce, water, cumin, garlic powder, and onion salt into the flour and chili powder until smooth, and continue cooking over medium heat approximately 10 minutes, or until thickened slightly. Season to taste with salt.
Monday, May 7, 2012
Crockpot Salsa Chicken
I joke that for my freezer meals post baby I baked up tons of chocolate chip cookies and froze them. While this is actually true, I do have a good amount of chicken breasts, bone in chicken, steak and ground beef stocked in the freezer for easy grilling as well.
When I was thinking up what I wanted to eat on Cinco de Mayo, nachos was on the top of my list. And that made me think of Ale House nachos, which are layered with chicken. I remember when Salsa Chicken in the crock was all the rage, so I took to my google reader and searched for the recipe. I ended up going with a modified version (if you go to the original site, you will see a cooking time of 6-8 hours. Luckily I checked mine at 4 hours because it was done and would have been way overcooked any longer - just something to note).
I love how easy it was (hello, crockpots are the best, why don't I use it more?!) and that I now have this chicken in the freezer to go with my other meats. It would go great in tacos, enchiladas, burritos, quesadillas and even on tostones. *note- photo was taken after the chicken was shredded but before going back into the sauce. I froze the remaining sauce and chicken in a big gallon ziplock.*
Crockpot Salsa Chicken (from Stephanie Cooks)
4 large chicken breasts
8 ounce can tomato sauce
1 cup salsa
1 packet of taco seasoning
1 tsp cumin
Combine all of the ingredients and cook on low for 4-5 hours. Shred with two forks once done and place back into the sauce to coat.
Thursday, May 3, 2012
Paper Chocolate Chip Cookies
There are so many recipes out there for chewy, thick chocolate chip cookies. I admit that I love this kind of cookie, especially gooey in the middle, but sometimes I want to mix it up. When I saw these thin chocolate chip cookies on Pinterest, I pinned and decided to make them to store in the freezer. My mom is one who likes really crisp cookies, so this recipe reminds me of her. They are paper thin but the centers remain chewy, with a crisp outside. You get the best of both cookie worlds and I honestly have eaten way too many of these in the past few days.
These do take a while to make as you need to leave plenty of room for the cookies to spread on your baking sheet, so you will do plenty of batches. I also suggest not using the parchment paper and just opting to drop the dough onto the baking sheet itself. I ended up freezing some of the dough in balls to bake later because I was tired of standing for 2 hours, and I had already baked plenty! Just ignore how much butter is in these when you indulge, since the recipe makes so many there isnt too much butter in each (at least thats what Ive been telling myself).
Paper Chocolate Chip Cookies (from Martha Stewart)
3 1/2 cups all-purpose flour
1 1/2 teaspoons table salt
2 teaspoons baking soda
1 pound (4 sticks) unsalted butter, room temperature
3 cups packed light-brown sugar
1 cup granulated sugar
4 large eggs
2 teaspoons pure vanilla extract
1 1/2 cups semisweet chocolate chips (or 2 cups like I did)
Preheat oven to 375 degrees. Line two baking sheets with parchment paper, and set aside. In a large bowl, sift together the flour, salt, and baking soda; set aside. In the bowl of an electric mixer fitted with the paddle attachment, beat the butter on medium speed until smooth. Add the sugars, and beat until combined and fluffy. Beat in the eggs and vanilla until well blended.
Add flour mixture, and beat on low speed until combined. Add the chocolate chips, and beat until combined.
Drop 2 to 3 tablespoons of batter at a time onto baking sheets (a cookie scoop is ideal for this batter), about 2 inches apart. Bake until golden brown, about 8 minutes, rotating halfway through. Remove the cookies and the parchment paper from the baking sheets, and let cool on a rack. (like I said, I found putting the dough directly on the sheets worked much better than the parchment paper, but feel free to experiment)
*Store in an airtight container or place directly in the freezer.
Saturday, April 14, 2012
Sweet & Sticky Baked Chicken
I went out to the grocery store and stocked up on split chicken breasts and ground beef, so that we have some easy things to throw on the grill once the baby arrives. I don't want to be in charge of thinking up and shopping for dinners each week, and since it's summer it will be ideal to use our grill as much as we can.
While I was in the meat section I picked up some chicken tenders to cook up for a weekend dinner and then was left wondering what to do with it. I didn't want to bread it so I opened my google reader and found this recipe. While it is originally for drumsticks, the marinade just sounded so good to me, so I put everything together and popped it in the fridge for the day to marinate.
Sweet & Sticky Baked Chicken (from The Novice Chef)
1/4 cup balsamic vinegar
1/4 cup honey
1/4 cup light brown sugar, packed
2 tablespoons low-sodium soy sauce
3 garlic cloves, minced
1 tablespoon minced fresh ginger
1/2 teaspoon fresh cracked black pepper
6 chicken drumsticks, about 1.25 pounds (I used a little under 1 pound of chicken tender strips)
1 tablespoon sesame seeds, lightly toasted
a few pinches chopped fresh parsley
In a medium bowl, whisk together balsamic
vinegar, honey, brown sugar, soy sauce, garlic, ginger and cracked black
pepper. Pour into a large ziplock bag and add chicken drumsticks.
Shake to coat chicken and refrigerate for 8 hours, or overnight, giving
the bag a shake whenever you think about it.
Preheat oven to 400°F. Line a rimmed baking sheet with foil and place a cooling rack on top.
Remove the chicken from the bag, reserving the marinade, and place the drumsticks on the rack. Bake the drumsticks, on the middle oven rack, for 25 minutes. (I cooked for 7 minutes)
While the chicken is baking, place the leftover marinade in a small saucepan. Bring the marinade to a boil, then reduce the heat to a slow simmer. Cook over low heat, stirring as needed, for about 15 minutes or until thickened. (I put my chicken in for the first 7 minutes after cooking down the sauce for 7 minutes, so that they would both be ready at the same time)
Remove drumsticks from oven (after first 25 minutes of cooking)(7 for me and my chicken tenders) and heavily coat with the thickened marinade, using a silicone pastry brush. Return to the oven and cook for 10 more minutes (I returned for 4 minutes). Coat the drumsticks again and return to oven to cook for 5 more minutes, or until an internal temperate of 160°F is reached (I did another 4 minutes)
Coat the drumsticks one last time, with any remaining sauce, and sprinkle with sesame seeds and parsley. Serve immediately.
Preheat oven to 400°F. Line a rimmed baking sheet with foil and place a cooling rack on top.
Remove the chicken from the bag, reserving the marinade, and place the drumsticks on the rack. Bake the drumsticks, on the middle oven rack, for 25 minutes. (I cooked for 7 minutes)
While the chicken is baking, place the leftover marinade in a small saucepan. Bring the marinade to a boil, then reduce the heat to a slow simmer. Cook over low heat, stirring as needed, for about 15 minutes or until thickened. (I put my chicken in for the first 7 minutes after cooking down the sauce for 7 minutes, so that they would both be ready at the same time)
Remove drumsticks from oven (after first 25 minutes of cooking)(7 for me and my chicken tenders) and heavily coat with the thickened marinade, using a silicone pastry brush. Return to the oven and cook for 10 more minutes (I returned for 4 minutes). Coat the drumsticks again and return to oven to cook for 5 more minutes, or until an internal temperate of 160°F is reached (I did another 4 minutes)
Coat the drumsticks one last time, with any remaining sauce, and sprinkle with sesame seeds and parsley. Serve immediately.
Friday, April 13, 2012
Freezer Smoothie Packs
Well, here is another idea from pinterest! I am trying to come up with quick, healthy foods for me to eat and freezer bag smoothies is so obvious yet nothing I thought of doing until it was placed in front of my eyes. You can buy any fruits and just portion them into baggies then add milk! I actually decided to go with light soy vanilla milk because I heard that it has a creamier consistency. And since a carton of that is good for much longer than regular old milk, you don't have to worry about making these all at once.
I made 8 packs using 30 oz frozen strawberries, 12 oz frozen raspberries and 4 bananas. It equaled out to about 1/4 cup raspberries, 7 strawberries and 1/2 banana per baggie. I added about 1 cup milk and blended until smooth.
I also bought frozen, shredded coconut to add in when I feel like it. These are fun because you can do so many different combos and they are so easy to throw together.
Monday, February 27, 2012
My Mom's Meatloaf
When I hear the word meatloaf I immediately have this feeling about it - that no one wants anything to do with it. I don't think that any of my sisters eat meatloaf and it's not something you would ever see someone picking out on a restaurant menu (at least, no one that I know).
With all of that said, I happen to like meatloaf! It is more than a hunk of meat in a loaf shape, which may be where some of the stigma comes from. It is an easy dinner to throw together or pull out of the freezer. My mom has always made hers with potatoes and carrots which adds to the flavor of it all. I eat mine with a dipping sauce of bbq for some reason, I think it's the onion/beef combo. Anyway, I suggest trying this out and adding some fresh bread to go along with it.
Mom's Meatloaf
Bake for about 1 hour on 375 and then raise the temperature to 400 and bake for another 15 minutes.
With all of that said, I happen to like meatloaf! It is more than a hunk of meat in a loaf shape, which may be where some of the stigma comes from. It is an easy dinner to throw together or pull out of the freezer. My mom has always made hers with potatoes and carrots which adds to the flavor of it all. I eat mine with a dipping sauce of bbq for some reason, I think it's the onion/beef combo. Anyway, I suggest trying this out and adding some fresh bread to go along with it.
Mom's Meatloaf
1 to 1 ½ lb ground beef
1 egg
1/2 cup Bread Crumbs
3/4 White Onion, chopped or minced (you can adjust this to whatever you'd like, I happen to like onion)
Salt
Pepper
4 large carrots, peeled and sliced (thick slices)
3 medium russet potatoes, chopped thick
2 small cans Tomato Sauce
1 1/2 small cans water
4 large carrots, peeled and sliced (thick slices)
3 medium russet potatoes, chopped thick
2 small cans Tomato Sauce
1 1/2 small cans water
Preheat the oven to 375
Mix beef through pepper together and place in large cooking pot
Cook potatoes and carrots till almost soft but still firm - boil for about 10 minutes
Pour 1 or ½ cans water over meatloaf
Friday, September 9, 2011
Feel Good Food: Crockpot Beef Stew
Being that I lived in the Florida heat for the last 12 years or so, I could never crock in early september, so now that Im in Nashville, when the temperature drops I want to take full advantage. I decided to make beef stew and freeze it in individual portions after I ate my own bowl. The beef was tender and it all blended together perfectly while I was at work. The smell that lingered in the house was perfect for the weather - cloudy, rainy and about 60 degrees. I hope to crock more and make freezer meals for lazy cold days. For now, I suggest trying this! I ate this with some fresh bread from publix - slightly spread with butter and topped with a little sat, garlic powder, onion powder and pepper and a sprinkle of mozzarella.
Beef Stew (adapted from allrecipes.com)
2 lbs Stew Meat
1 Onion, chopped
1/4c All Purpose Flour
1/2 tsp Salt
1/2 tsp Black Pepper
1 packet McCormicks Beef Stew Seasoning
1 clove Garlic, minced
2 tsp Paprika
1 tbsp Worcestershire Sauce
2 Bay Leaves
1.5 c Beef Broth
1/4c Water
2 baking potatoes, diced
4 Carrots, sliced
1 stalk Celery, chopped
Place meat, flour, salt and pepper in a ziploc bag and shake until meat is completely covered. (for an extra step, brown the meat in olive oil on medium high in a skillet.)
Add everything to the crockpot. Give it a stir and cook on low for 10-12 hours, or high for 4-6.
Tuesday, July 26, 2011
PB & J Cookies
I have really been on a peanut butter kick, which is not like me and a pleasant change actually. I wanted to make these cookies a while ago but didn't have anyone to share them with and I was concerned about their freezing factor with the jelly. Turns out they are awesome from the freezer! I whipped up a batch and froze them, taking half to my parents house this weekend and leaving half for me. My sisters ate them all up and agreed that they weren't sure how jelly on a cookie would be but that it worked. For some reason my cookies flattened out, so next time I will try chilling the dough before I fill it with the nutella/jelly combo.
This cookie screams 'fun for kids' to me, too!
PB&J Cookies (from My Baking Heart)
1 c peanut butter
1 c sugar
1 lg egg
2 tbsp all-purpose flour
1/2 c jelly
2 tbsp Nutella (optional)
Preheat oven to 375 degrees F and line baking sheets with parchment paper. Combine peanut butter, sugar, egg, and flour in a large bowl & mix until well combined. Roll the dough into small balls and place on a baking sheet (about 15 to a sheet). The dough is a little crumbly, so I would squish each piece in my hands before rolling them into a ball shape.
Using a small rounded spoon, make an indent in the center of each cookie, deep enough to allow for jam filling. If using, place about a 1/4 teaspoon of Nutella into each cookie. Place about 1/2 to 1 teaspoon of Jelly on each cookie (don’t worry if the jelly overflows a little, it will pretty much hold its shape through the cooking process). Bake for 8-10 minutes. Let set and cool on a wire rack for about 10 minutes before eating.
This cookie screams 'fun for kids' to me, too!
PB&J Cookies (from My Baking Heart)
1 c peanut butter
1 c sugar
1 lg egg
2 tbsp all-purpose flour
1/2 c jelly
2 tbsp Nutella (optional)
Preheat oven to 375 degrees F and line baking sheets with parchment paper. Combine peanut butter, sugar, egg, and flour in a large bowl & mix until well combined. Roll the dough into small balls and place on a baking sheet (about 15 to a sheet). The dough is a little crumbly, so I would squish each piece in my hands before rolling them into a ball shape.
Using a small rounded spoon, make an indent in the center of each cookie, deep enough to allow for jam filling. If using, place about a 1/4 teaspoon of Nutella into each cookie. Place about 1/2 to 1 teaspoon of Jelly on each cookie (don’t worry if the jelly overflows a little, it will pretty much hold its shape through the cooking process). Bake for 8-10 minutes. Let set and cool on a wire rack for about 10 minutes before eating.
Tuesday, July 19, 2011
Flank Steak Sandwiches
I love red meat but it isn't something that I cook often since I don't really consider myself a grill master, or even a grill amateur. I leave that to Adam! So when I make flank steak it is in the form of chinese, and in this case steak sandwiches. We both love salty foods so cheesesteaks would be good with this meat also, but to make a more summer inspired meal, go with this recipe. I had the idea from a restaurant at Cocoa Beach. They use filet but the flank works perfectly also. You may want to cut it into smaller pieces once cooked and make sure to not overcook the meat because it will become too tough. This is also a good way to use frozen meat or bread, which is how this came about for us.
Flank Steak Sandwiches
2 Hoagie Rolls
1/2 lb or so Flank steak, sliced thin (I used about 6 strips per sandwich)
1 tomato, chopped
1/4 Red Onion, chopped
1/4 can Black Beans, drained
S&P
2 tbsp Light Mayo
1 tbsp Butter, softened
Lettuce
Heat oven to 375 degrees. Heat a grill pan on medium high heat.
Slice rolls and spread butter on the insides. Place them into their own foil packs and place in oven.
Sprinkle S&P onto steak and place on grill pan. Cook for about 4 minutes on each side.
Combine onion, tomato and beans. Add S&P and toss.
Once meat is cooked, remove rolls from oven. Spread mayo on insides and place a couple spoonfuls of tomato mixture on the bottom. Place steak on top and add the rest of the tomato mix. Add lettuce.
Monday, July 4, 2011
BBQ Pulled Pork in the Crock
Since Adam and I both worked on the 4th this year I wanted to ensure that we would still have a BBQ style dinner. We grilled out all weekend so we didn't miss out on ribs, dogs or burgers and this was a welcomed meal. I found this pulled pork recipe over at The Novice Chef, which has a lot of great recipes. I was interested and scared at the same time when I saw that it required just a coca cola, chili powder and garlic powder to cook. I definitely trust the source so I gave it a whirl. It was so easy (as crocking should be) and the meat was very tender. Dont be weary, go try it yourself. It's perfect for your next cookout or quick meal. Pop it in the freezer for another day, too!
BBQ Pulled Pork in the Crock (from The Novice Chef)
3 lb Pork Butt (Roast)
1 liter Coke
3 tbsp Garlic Powder
1/4 cup Chili Powder
BBQ Sauce (Around 1.5 cups)
Season the whole pork butt with garlic and chili powder. Rub into the meat until well coated.
Place a little bit of coke in the bottom of the crock pot and place the roast on top. Fill the pot with more coke, until the meat is almost completely covered with the liquid. Cover and cook on low for 8 hours.
Take meat out of the pot and dump the coke. Shred meat and add back to pot, along with bbq sauce. Add the amount of sauce that you want. *At this point you can freeze some of the meat without the sauce if you'd like also.* Stir to combine meat with the sauce and turn to warm to keep it nice and toasty until you dig in.
Place on buns, in a tortilla, atop a salad or all by itself! I had sliced red onion with mine on a fresh publix french hamburger bun with mac n cheese and roasted veggies. Enjoy!
Sunday, July 3, 2011
Classic Waffles
I don't know about you, but one thing that I like to make sure of is that any guests are well fed. Food is a pretty important part of my daily life, so it's one thing I really like to focus on. We had a great dinner last night, and before my dad and Adam went golfing and my mom and I sat down for Casey Anthony's closing arguments, I wanted to make sure that we each had a full tummy. My sister Kelly got me a waffle maker for my bridal shower, so I put it to use for the first time this morning!
To make these patriotic you can use fresh blueberries or sliced strawberries in the batter, or put them on top with some whipped cream. I also used chocolate chips as a mix in.
Classic Waffles (adapted from AllRecipes) - made about 8 waffles
1 cup All Purpose Flour
1 cup Whole Wheat Flour
1 tsp salt
4 tsp Baking Soda
2 tbsp White Sugar
2 Eggs
1.5 cup Warm Milk
1/3 cup Butter, Melted
1 tsp Vanilla Extract
Mixins such as strawberries, blueberries, chocolate chips, etc.
Combine dry ingredients in a large bowl.
Combine all wet ingredients and fold into dry, stirring until well mixed.
If you want different mixins, just separate batter into different bowls and mix in your item.
Cook according to waffle maker instructions. You can freeze any leftovers and re-cook in the toaster oven.
To make these patriotic you can use fresh blueberries or sliced strawberries in the batter, or put them on top with some whipped cream. I also used chocolate chips as a mix in.
Classic Waffles (adapted from AllRecipes) - made about 8 waffles
1 cup All Purpose Flour
1 cup Whole Wheat Flour
1 tsp salt
4 tsp Baking Soda
2 tbsp White Sugar
2 Eggs
1.5 cup Warm Milk
1/3 cup Butter, Melted
1 tsp Vanilla Extract
Mixins such as strawberries, blueberries, chocolate chips, etc.
Combine dry ingredients in a large bowl.
Combine all wet ingredients and fold into dry, stirring until well mixed.
If you want different mixins, just separate batter into different bowls and mix in your item.
Cook according to waffle maker instructions. You can freeze any leftovers and re-cook in the toaster oven.
Monday, June 6, 2011
Swiss Stuffed Turkey Burgers
While I still love beef burgers, I get the craving for Turkey Burgers whenever we decide to grill out, which we did this weekend. We grabbed some ground turkey and I made 2 patties to cook and froze 2, after seasoning. I also got 80 calorie burger buns, because If I'm going to use 97% fat free meat I may as well stick with it into the carbs!
Swiss Stuffed Turkey Burgers
1.25lb Ground Turkey
3 tbsp BBQ Sauce
1 tsp Garlic Salt
1 tsp Onion Powder
S&P
4 thick slices Swiss
Combine ingredients 1-5. Form into 4 patties. Split each patty in half and place a piece of cheese on top of one half. Place the other on top and seal the edges to keep the cheese inside.
Grill on medium heat for 10 minutes, or until done throughout. Top with whatever topping you prefer, I use red onion, lettuce, mayo and tomato.
Subscribe to:
Posts (Atom)